Friday, March 20, 2015

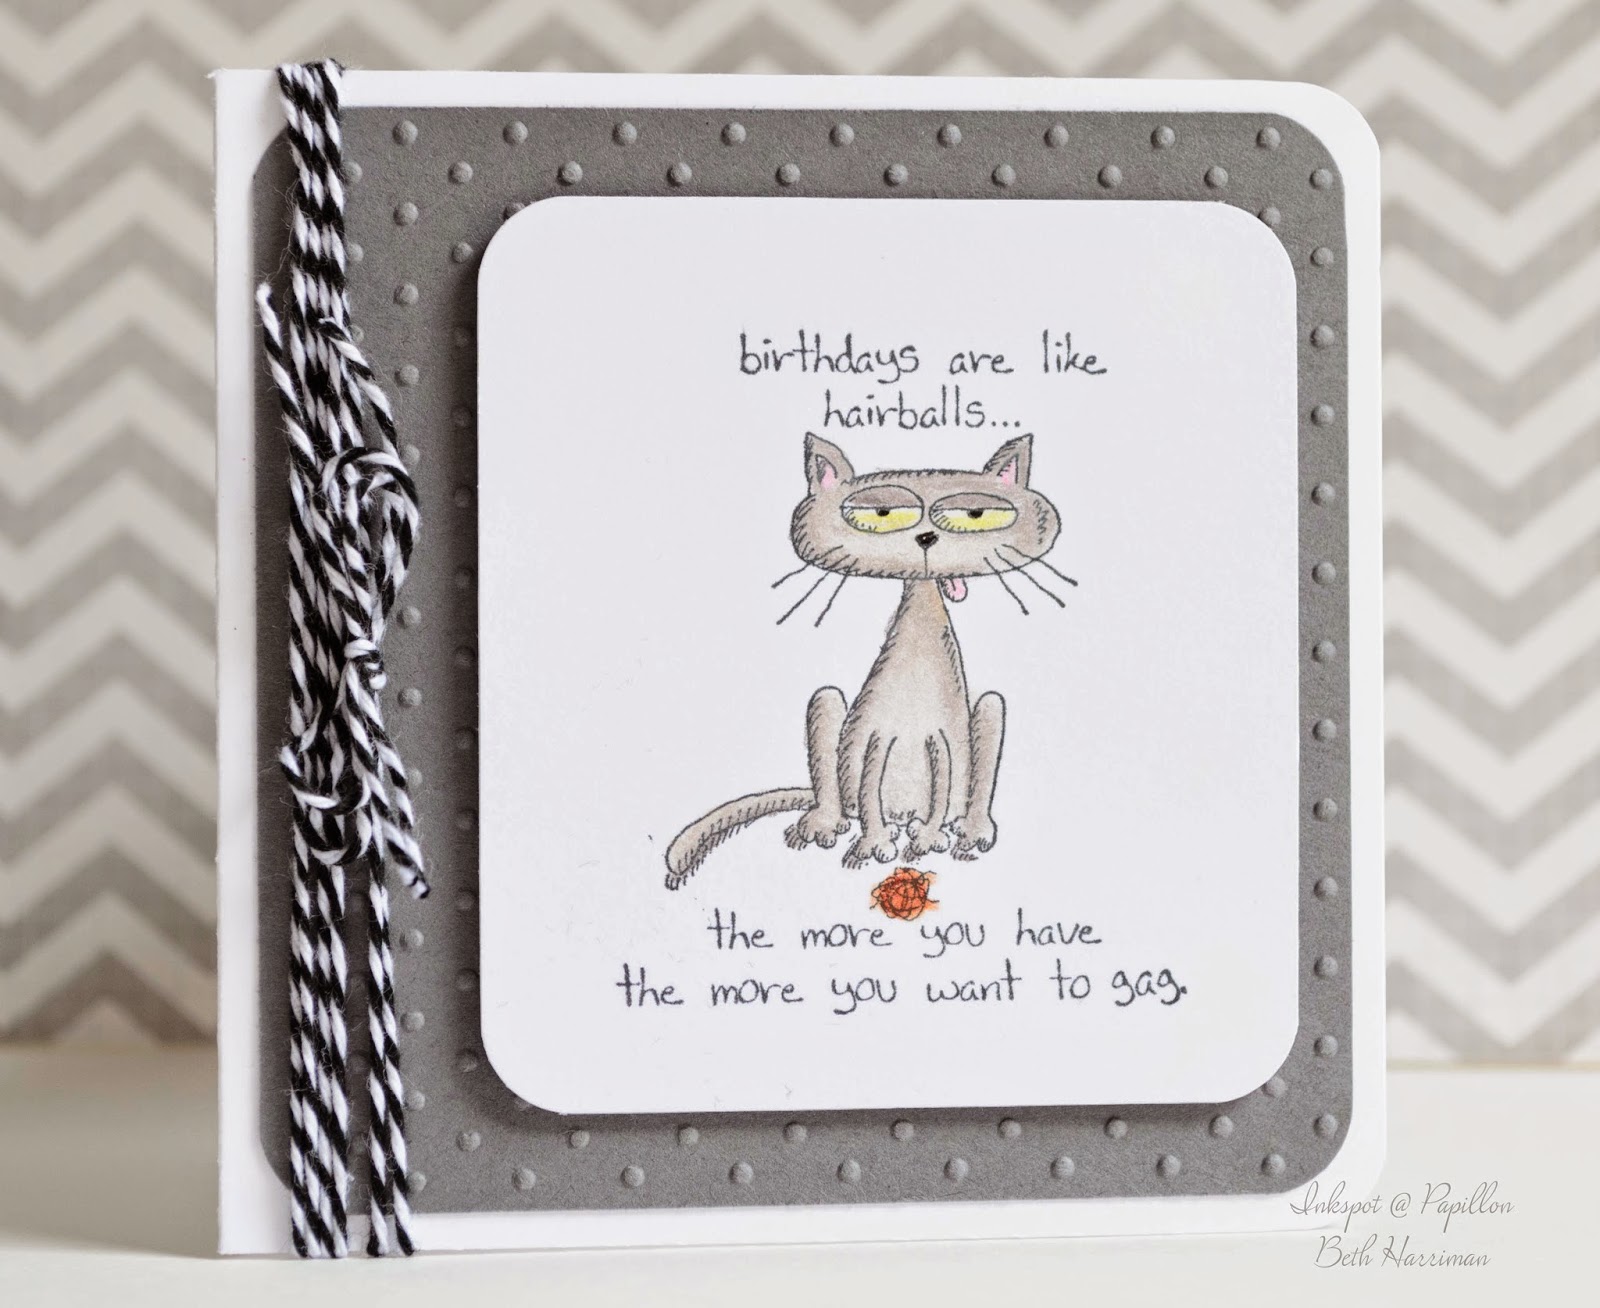
Smarty Cat Sends Warm Fuzzies


 Hi again!

I came up with this card for the Simon Says Stamp Monday Challenge.  The inspiration is 'animals' and I knew right away that I wanted to use Smarty Cat.

When I purchased this stamp set, I did so thinking that it would be fun to use on kraft card stock with Prismacolour pencils, especially white, so the design of the card came very easily.

Once again, I thought I'd love to narrate the video while I was doing it, but before editing, it was an hour long.  Maybe I just talk too much, but I can never seem to get a short enough video without doing a bunch of editing!

Smarty Cat is another stamp from Stampingbella, and I seem to be on a Stampingbella spree lately.  It's hard not to though - they're such awesome designs!


In the video I mention that the kraft paper is cheap stuff, and it is super inexpensive (Recollections brand from Michael's).  It's great paper to colour on though.  However, it's quite flimsy so if you're looking at using it for a card base, you might want to think again.  It is a nice dark kraft though, and takes colour really well.  It was perfect for this card because it's so light it doesn't really add any weight to the card at all.

The set does come with its own sentiment, but I chose not to use it.  Instead, I used one of the sentiments from Hero Art's Everyday Sayings.  This is a great set to have on hand because it has a variety of sentiments in different fonts.

Smarty Cat does come with his own toys.  His ball of yarn, a toy mouse, and a fish skeleton were perfect to complete the inside of the card.


Up next is the video, which I hope you'll watch.  I added some cool music to it this time while I coloured instead of talking.  (Cool tune called Sanskrit which comes built into iMovie)

Enjoy the video, and I hope you'll subscribe!


See you next time!
Beth


Card Sizes

Finished card: 5" x 6-1/2"
Kraft layer: 4-3/4" x 6-1/8"
Black layer: 4-7/8" x 6-1/8"

Some of what I used...

Prismacolour Pencils
White
Black
Pink
Magenta
Light Aqua
Light Umber
50% Warm Grey
30% Warm Grey
Sakura White Gelly Roll Pen (available almost anywhere)
Memento Tuxedo Black Ink
Momenta A2 Circle Embossing Folder
Ranger Craft Sheet
Fiskars SureCut Paper Trimmer
Martha Stewart Score Board
Scotch Brand ATG Tape Gun - Simon Says Stamp


Thursday, March 19, 2015

Madison and her Margarita


Hey everyone!

One of my goals this week (should I have goals on March Break???) was to enter a few card challenges, which I'm happy to report - I've done!

I wanted to do the current Sketch Challenge at My Favourite Things, and I went back and forth on designs, stamps, paper, ideas...  It literally took most of the afternoon to decide.  But that's OK!  I'm really enjoying this week off and having time to just delve feet first into all these projects, while not having to worry about a thousand other things.

I chose one of the Uptown Girls stamps from Stampingbella.  I have a definite weakness for all things Stampingbella...  So for this one it's Madison has a Margarita.

( I'd like a Margarita...)

Madison screams out for bright lively colours, so she's dressed in Copics and Peacock Feathers Distress Ink.  I used Simon Says Stamp's Falling Snow stencil (sideways) to add the dots with Peacock Feathers, and then used the same ink to blend her "aura".


I made a mask with a post-it note - I stamped the image and then just cut out one side so I didn't get dots on her lovely self.  This is a really quick way to make a mask, and it can be re-used over and over again.  For this application, the mask didn't have to be cut out very carefully, so it only took about a minute to get ready.  I should have taken a picture of this, but I didn't think of it at the time.


To give her a little bling I added clear Wink of Stella to her dress, her drinks, hair and in a very line shadow around the image.  Luckily, my camera was able to pick up a bit of the shimmer!


 One of the things I love about Stampingbella's images, besides the fact that they're just so adorably cool, is that they're really fun to colour!

I took a little creative liberty with the sketch, but creative liberty is always ok in my books.

I didn't make a video of this card, but I'll probably re-create it and shoot it then.

Here's a question for you guys...

Do you have a favourite Stampingbella line or a favourite stamp?  I just can't decide!

See you next time!
Beth


Wednesday, March 18, 2015

Ride On, Dolores. Ride on.


Hey everyone!

A couple of weeks ago I was on a website that I really like, and saw that she's having her very first challenge using stencils.   You should really check out her site - Live Love Cards - she's got some very cool stuff on there!   She also has this blog and this YouTube channel with all sorts of things from product comparisons, technique tutorials, and reviews.

And no, she's not paying me for the plug.  :)

Anyway.  My imagination started working, and since then I've been planning.

Here in Canada, there is a huge shortage of craft stores catering to the stamping / scrapbooking / card making population, so I'm always on the lookout for stores on this side of the border that are within driving distance.  I found one and took a drive yesterday.

One Crazy Stamper is in Bolton, Ontario, and they carry a ton of different things - from Copics, to stamps, stencils, inks, and patterned paper.  It's just north of Toronto (about an hour's drive from where I live), and you can also order online from them.  While I was there, they were filling an order from Australia!  Well worth the visit if you get a chance.  Their website has some great stuff on it as well.

Nope - they're not paying me either.  This must be the day for plugs!

So as I was browsing around the store, I saw a stamp set that I had been eyeing online.  It's the perfect stamp for me - SENIOR-ita Dolores is blazing a trail on her very cute little scooter.  Since I have a little 120cc bike myself, I was kind of partial to Dolores.  I imagine that I'll look just like her 30 years from now!

On my way home is when the ideas really started to fly.

I coloured her using Ranger Distress Ink and a water brush, which means I actually used the ink like water colour paints.  The whole process of painting her took over an hour, as I hadn't tackled anything quite as complicated before.


Because one of my other hobbies is street/urban photography, I wanted to give little Dolores an urban feel, so a graffitied brick wall seemed like the perfect background - a pretty cool juxtaposition for sweet, little Dolores!

I wanted to continue the feel of the outside of the card onto the inside, so I used the same stencil to bring the wall onto the inside.


This is probably the most labour intensive card I've done, but I really enjoyed the whole process.  So much so, that my usual very tidy work area ended up looking like this:


And yes...  that IS a table leg on top of the table.  My video camera is perched up on top of the table and a box while I record things.  Not the most professional of set-ups, but it works!

Check out the video below to see how Dolores came to life.  I didn't tape the colouring process because it took so long, but the rest of the card, including the making of the brick wall is included.


I hope you enjoy the video and the pictures as much as I enjoyed making it!

See you soon!
Beth


Finished card size: 5" x 6-1/2"


Some of What I Used...

Find me on...

My Stamping' Up!® Website
YouTube

Tuesday, March 17, 2015

Hey There Chickies

Hey everyone -

I'm back again with a clean and simple card, which is also a quick and simple card!

A couple of weeks ago I was doing a letter writing activity with my class (yup, I'm a teacher with a split 7/8 class), and none of them had any idea how to address an envelope or mail something!

What???

You read correctly...

In this day and age, where the Internet and email rein supreme, these little muffins have no idea how to post a letter!

So this got me thinking...

I remember being a little girl and walking to the post office with my grandmother who was from Scotland.  There was always a card or letter waiting for her from a friend or relative, and we would read it together.  I was always so excited to do this with her!

Maybe I'm showing my age here, but I really miss the wonder of getting a hand written letter or card in the mail!

So, for 2015, my promise to myself is that I will send someone something in the mail once or twice a week, and hope that I make their day.

It was all of this thinking that prompted this little card.  It's the perfect size to just send a hello to let someone know you're thinking of them.


This card starts off with Neenah Solar White 80 lb.  I wanted a frame set within the centre, so I measured 1 inch in from each side and used a paper piercer to create it, creating my scene inside the square.


All the black stamping is Memento Tuxedo Black, which is Copic safe, since that's what used for the colouring.

I carried the orange to the inside of the card as well, and used a little heart to add some interest, and to break up the stark white.


Finally, I added a fun but simple sentiment!


Check out the video below to see how it all came together.  Just a word of warning, about 5 minutes before doing the voice over, I choked on my tea, so my voice is a little raspy!


See you next time!
Beth

Card - Sizes

Finished card size: 4" x 4"
Focal layer:  3.75" x ", scored and folded at 5-1/2"
Focal Image: 3-3/4" x 3-3/4"
Tangelo Twist layer: 3-7/8" x 3-7/8"

Some of What I Used...

Find me on...

My Stamping' Up!® Website
YouTube

Monday, March 16, 2015

A Blended Ink Thank You!

This card is going to be entered in the Lawnscaping Challenge!  If you're interested in having a look at all the great work that gets posted over there, follow the link!
________________________________________________________________________________


With spring hopefully just around the corner, I'm finding myself drawn to more earthy, warm colours.  So when I was brainstorming my next post and video, I automatically reached for browns, greens, and yellows (with a little blue thrown in for good measure).

One of the first techniques I tackled way back when, was blending distress inks.  I've always been drawn to colours and different shades, values and saturation levels of colours, and putting colours together to create a feeling or mood.

Years ago I worked as a graphic artist doing magazine advertising, and I think it was the freedom in use of colour that drew me to the profession.  Unfortunately, all the work was done on computer and I really missed the "getting my hands dirty" part.

For various reasons I left the profession and moved onto other things, but the things I learned have always stuck with me and have been really quite valuable in my later endeavours!

Ok... Enough story-telling.  Let's get back to the card.

As I said, I wanted some warm colours, and I knew I wanted to incorporate ink blending.  I love the versatility of distress ink, so I rummaged through my stuff and and idea was born.


I used four colours of Ranger Distress Ink and ink blending tools (also by Ranger).  The pattern was achieved by taking a stamp, inking it with Versamark and then loading water to the stamp.  I shook off the excess water so I didn't flood the card, and let the magic happen.  I used a paintbrush dipped in water, and flicked it over the card to create the water spots.  It's such an easy process with dramatic and always unique results.


The sentiment, a very simple "thank you", was heat embossed on a small piece of Early Espresso card stock by Stampin' Up!.  I used champagne coloured embossing powder.  It's such a gorgeous colour and complimented the colours of the card perfectly.


As always, I can't leave the inside naked, so I adhered a piece of Neenah Solar White 80 lb card stock using an ATG gun, and stamped the same flourish once in Stampin' Up! Chocolate Chip ink.  I stamped it off twice on scrap paper so that the brown of the ink was a little more muted. 


I have to say, I love the way this card turned out.  From the colours, the card stock, the distressed focal image - everything just came out exactly as I'd imagined it!

Check out the video to see it all come together:


See you next time!
Beth

Card - Sizes

Finished card size: 4-1/4" x 5-1/2"
Card Base:  4.25" x 11", scored and folded at 5-1/2"
Focal Image: 3" x 4-1/4"
Early Espresso layer: 3-1/8" x 4-5/16"
Mossy Meadow layer: 3-1/4" x 4-9/16"

Some of What I Used...

Find me on...

My Stamping' Up!® Website
YouTube

Sunday, March 15, 2015

A Happy Card

Hi everyone!

March is half over and spring MUST be around the corner.  We've broken zero degrees celsius everyday for over a week now.  That's a good sign, right?

I have an old friend who I haven't seen in years (and by years I mean probably not since 1985!), but I've always found her inspiring.  She's been on my mind lately for some reason, and I want to send her a card just to say hi.  She's one of those friends I speak to once every few years, and usually by social media, but as we literally grew up together since our families parents were close fiends, and we attended the same high school, it always feels like no time has passed.

So the other evening, I sat staring at my stamps and all of a sudden an idea slowly began to form in my mind, and this was the result.  It went through a few changes along the way, as usual, but I'm pretty satisfied with how it turned out!  The sentiment is especially fitting for her!


The process to make this card isn't complicated, but there are a few steps to get through.  Heat embossing and ink blending are the most difficult techniques, so if you've got those down, you're good to go.

I usually reserve ink blending for Distress Inks, but this time I used Stampin' Up! inks, and they worked like a charm.  The colour moved nicely and easily, and the two colours blended very nicely.  I'll use this ink for blending again, for sure!  I'm not sure how they will respond to being distressed (for example, with water) but perhaps a little experimentation with different things is in order.

NB:  I know.....  I could just look it up on the internet or YouTube - but let's face it.  Experimenting is more fun!

Here's the video that shows how the card came to like.  Hope you enjoy!


See you next time!
Beth

Card Sizes

Finished card size: 4.25" x 5.5"
Card Base:  4.25" x 11", scored and folded at 5.5"
Inside Card stock: 3-3/4" x 5"

Some of What I Used...

Find me on...

My Stamping' Up!® Website
YouTube

Saturday, March 7, 2015

A Bowl of Cherries and More Gamsol

Happy Saturday everyone!

Another busy work week is over, and I've finally found a few minutes to get some things done.    One item on my ever-growing list of to-dos was a second Gamsol video using the Giggle Greetings stamp set from Stamping' Up! to highlight both the ease and effectiveness of using something other than markers for colouring - Prismacolor pencils and Gamsol as a blender.


Now don't get me wrong!  I love my Copics, and after trying the newer Blendabilities from Stamping' Up!, I'm loving those too.  But seriously - if you used one medium over and over it would get a little monotonous!

The thing that I love about using the Prismacolor pencils is how easy they are to manipulate.  I've said in both of my Gamsol videos that that you don't need to be an artist on any level to get great results, and that's the truth!  Blending is a breeze!


So here's the second video in this 2-part video.  I show the making of the second card, and then the four in the set as a finished package.  I did change one thing after making the first card.  I decided that I didn't want to use a patterned paper as a layer.  After looking a few times I felt that it was a little busy and I really preferred the image to stand out more.

I'll also include a link to the first video below.

Either way turned out adorably though.  If you don't have this set you SHOULD!  It's got a more "adult" feel and humor.

I hope you enjoy!

Beth


Card Sizes

Finished card size: 4" x 4"
Card Base:  4" x 8", scored and folded at 4"
Coloured Card stock: 3-3/4" x 3-3/4"
Image: Trim to make you happy

Some of What I Used...

Find me on...

My Stamping' Up!® Website
YouTube